
Client Representative Data Entry
Data Entry Module
The Data Entry module is used by Project Managers and Offshore Client Representatives to regularly input relevant data and information, allowing IRIS to provide optimal visibility to project progress, status and forecast. The input data may also be subsequently used to analyse the performance of the contractor's vessels, vehicles and equipment within the Project Management Dashboard, and to ensure that entered lessons learnt are truly learnt and readily available during future procurement and evaluation exercises.
Whilst there may be a small element of replication with other other onboard reporting processes, this approach allows valuable data to be immediately and permanently stored in a structured database allowing for efficient visualisation, assessment and analysis both during the live operation and subsequently. By collating similar data across multiple projects, trends, recurring issues and lessons learnt can be identified, constructively informing subsequent operations and future projects.
The Data Entry module is accessed using the Table Icon. Data can be entered as often as desired necessary or as requested by the project manager. Whilst the DPR data is typically entered once per day, after the formal issue of the vessel Daily Progress Report (DPR), the Work Scope status data can be updated multiple times during the day or night. The overhead of such data entry update is relatively light and IRIS can be updated very quickly.
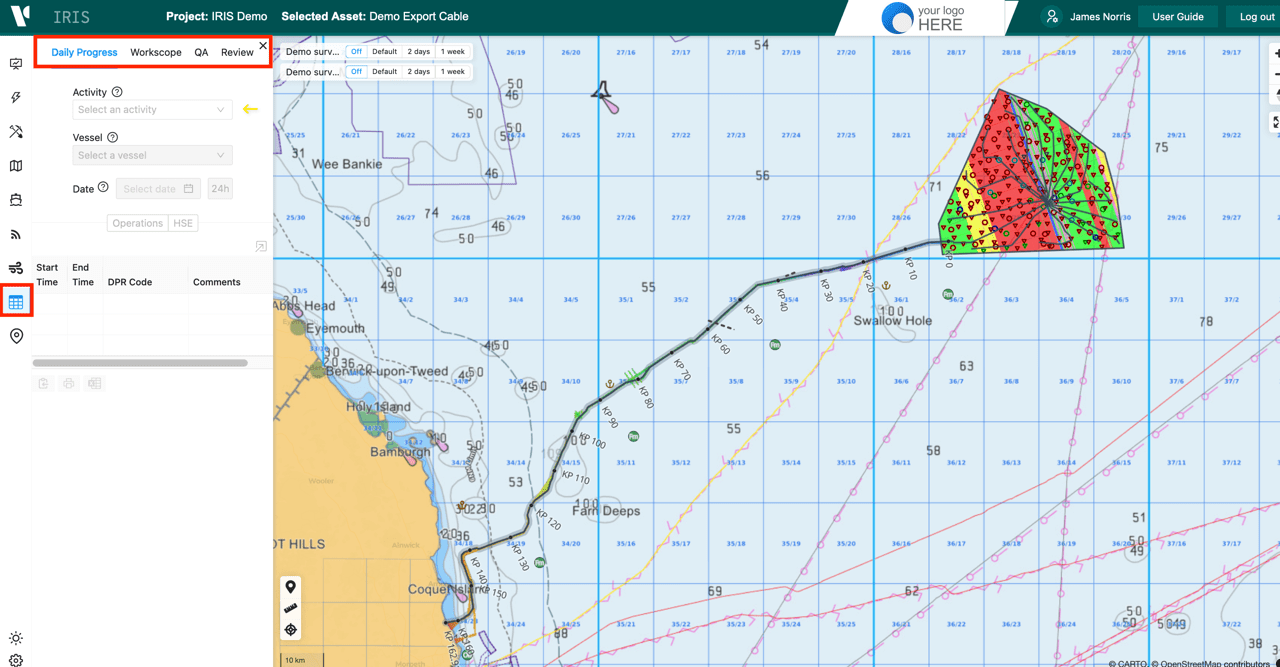
The initial Data Entry portal appears in the left hand section of the screen. The primary Data Entry areas are as follows:
- Daily Progress
- Work Scope
- Quality Assurance
- Review
Daily Progress
This section is for the loading of Operations and HSE data. The data is essentially copied from the agreed DPR. Note that where the data is already in CSV or TSV form it can be imported (See below). Data within PDF or Excel DPR formats will require to be manually entered. The DPR data should be entered as soon as possible after the release of the DPR onboard.
To enter DPR data:
- Select the correct
Activityfrom the drop down list for the project - Select the Vessel from the drop down list of vessel assigned to the
Activity - Select the required date for DPR data entry
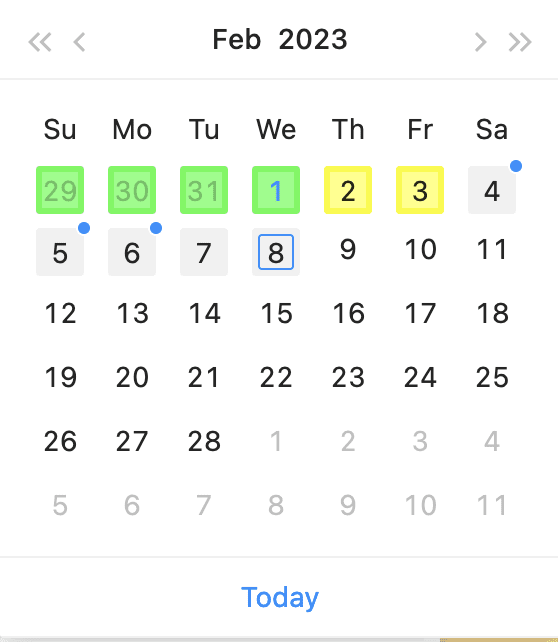
The colours on the date picker reflect the status of the DPR data entry for each day:
- Dates in
greenhave the full 24 hours of DPR data entry submitted and have been 'confirmed' as complete. However note they can still be edited if errors require correcting, and will then need re-confirming. - Dates in
yelloware either partially or fully completed, but in the latter case have not beenconfirmedyet. - Dates in
grey with a blue dothighlight that there is a DPR PDF available, received within IRIS, but no data entry has been submitted as yet.
A summary of the DPR data entry status for the selected day is now displayed. Note that there is a toggle between Operations and HSE data.
For both Operations and HSE tabs, the summary form can now be expanded to allow for DPR data entry, review and editing, using the Expand icon. Data entries made will initially only be cached within the user's web browser, and are only submitted to the IRIS database when the user clicks the submit button. For all data entry forms, a number of tools may be utilised from the bottom of each window as follows:

- Insert or delete a row of data
- Reset any changes made
- Copy the table to the clipboard
- Import an existing table - CSV (comma separated values) or TSV (tabbed separated values)
- Send the form to the printer or PDF
- Export the form to Excel
Operations
Using the formal DPR issued by the vessel, sequentially enter the DPR operational codes and time limits that apply throughout the day. The agreed DPR codes for the project vessel will be pre-configured by the IRIS team and are selected from a drop down list in the form. If there are any discrepancies identified, please notify the IRIS team as soon as possible. For each row of data the duration between stop and start time is calculated automatically. Please also add any brief and relevant comments associated with each identified time period. A number of automated checks will be applied to ensure that the time sequencing and totals are correct.
In some instances, the data will be pre-populated by our IRIS PDF scraper tools once the PDF has been inserted. In this case, please thoroughly check the information entered is correct before submitting and confirming the report.
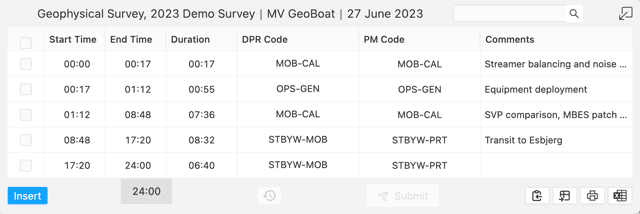
You will also notice a PM Code column in the form. The PM (Project Management Dashboard) code represents a mapping of the project-specific codes onto a standard set of DPR codes, allowing comparison and analysis across different projects and vessels. The PM Code mapping is pre-configured by the IRIS team or the Vysus Project Manager, and generally should not be editable offshore.
You can also import the data from excel using the Import button. Just make sure the headers and data format are pasted matching the data example provided:
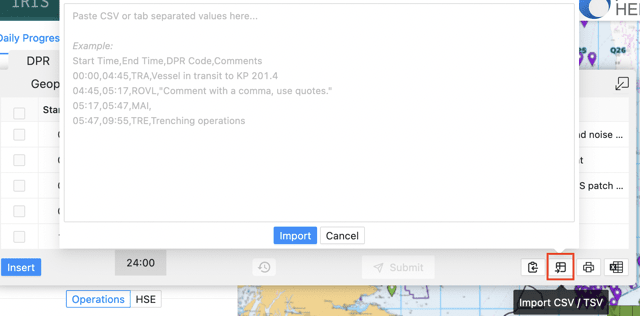
On completion of the necessary data entries, press Submit to update the IRIS database.
HSE
Please add the HSE performance indicators for each DPR day. The 'leading' and 'lagging' indicators presented are a standard set as defined by IMCA. Please use your judgement to interpret and map any project-specific HSE indicators, that the Contractor is using, onto this standard set of categories. Again, this might be pre-populated by our scraper so please check thoroughly.
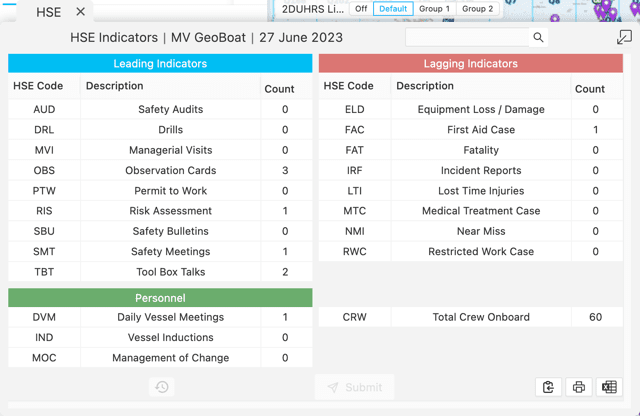
On completion of the necessary data entries, press Submit to update the IRIS database.
Confirming the DPR Report
Once both Operations and HSE data for the required DPR day are fully entered, you may 'Confirm' the report by clicking confirm. This will be greyed out if any conditions haven't been met such as there not being 24 hours of time or any data entered into HSE. Once clicked, this will turn the date in the date selector green. 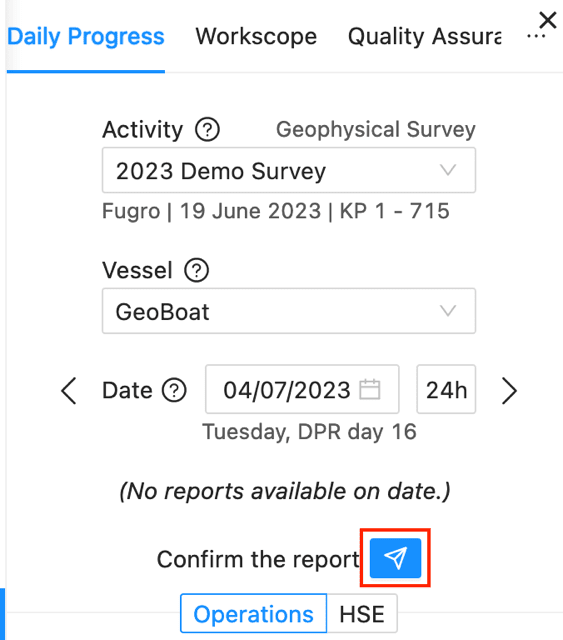
Work Scope
This section is for updating the status of the various pre-defined Work Scope elements. The Work Scope status is not specifically linked to the DPR and should be quickly updated throughout the day so that an accurate snapshot of work scope status is at all times available to the project manager, client and other approved shoreside IRIS users.
The Work Scope quantities and types are pre-configured by the IRIS team. Any new Work Scope elements that arise offshore, for example a new survey line or CPT location, should be sent to the IRIS team who will quickly update the database for you.
Work Scope elements are categorised within 4 defined types :
Lines- e.g. survey lines, including those undertaken on route surveysLocations- e.g. boreholes, CPTs, environmental sample locations, drilling locationsZones- defined survey areas that are reported by overall status rather than individual lines, eg jack up clearance, boulder clearanceRoutes- generally used where KP is the primary status progress indicator e.g. cable lay, cable trenching, pipeline inspection
A project Activity may have Work Scope elements for 1 or more of the 4 defined types.
Click on the Work Scope tab and select the relevant Activity in the normal way. Note that there is no place to enter the vessel name . This is because an Activity Work Scope may be completed by more than one vessel, as defined within the Activity configuration. The assigned vessel for an individual Work Scope element is therefore captured within each Work Scope status form.
A summary of the Work Scope status is now displayed. In the following example the only Work Scope type available is Lines Expand the form for data entry by clicking the Expand icon.
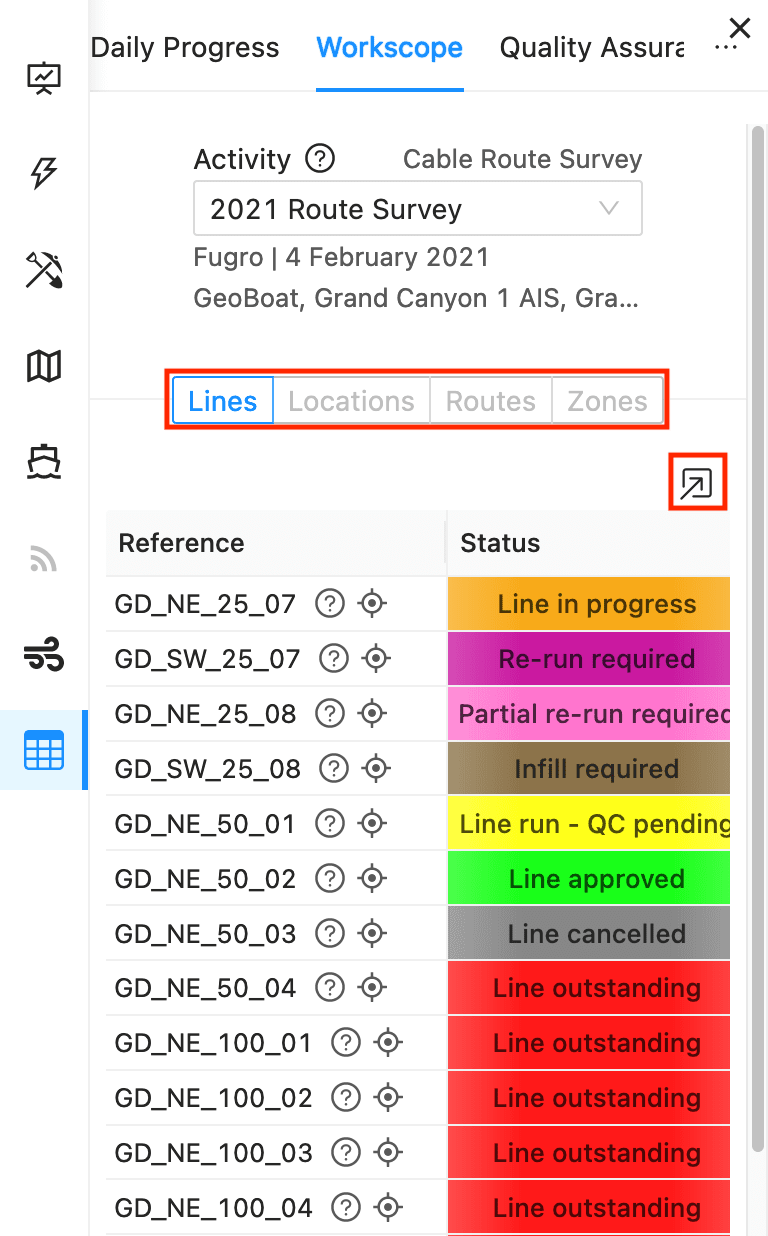
The full work scope status is now displayed with full granularity down to the individual line, location or cable route.
Work Scope - Lines
Each pre-defined survey line is listed. Associated information shows the line name, type, coordinates and main line/cross line (M/X) classification. A bullseye icon allows the users to zoom to the line on the map.
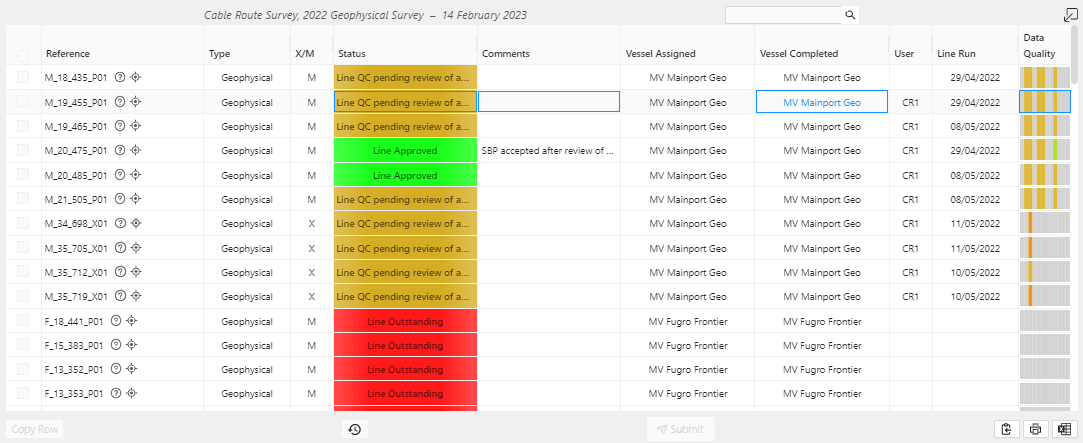
For each line, the OCR should maintain a regular update of the following information:
- Status - Update the
statusof the line from the options within the drop down list - Comments - Add appropriate comments with respect to the
lineor the survey of it - Vessel Completed - Add the name of the vessel that completed the
line, from the drop down list options - Date - Enter the date that the
linewas first run, and then on any subsequentstatuschange - Data Quality:
This section allows you to estimate and enter quality levels of the various Equipment and sensors used on the line. In this way issues and trends across multiple lines can be readily identified.
To do this, click within the column containing the graphic of vertical bars. Each bar represents one of the Equipment instruments and the colour of each bar represents the quality assigned.
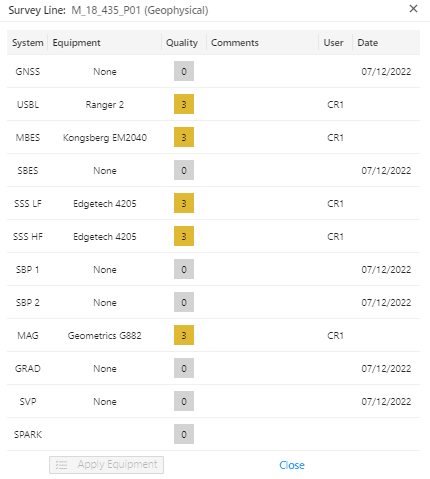
For each System listed, confirm the Equipment type being used, enter the quality of the data (0-5), and add any comments. The User and Date columns are auto populated.
Once the Equipment details have been entered for one line, they can be applied to ALL lines by clicking Apply Equipment
In this section you can also do re-runs by clicking the button on the bottom left: 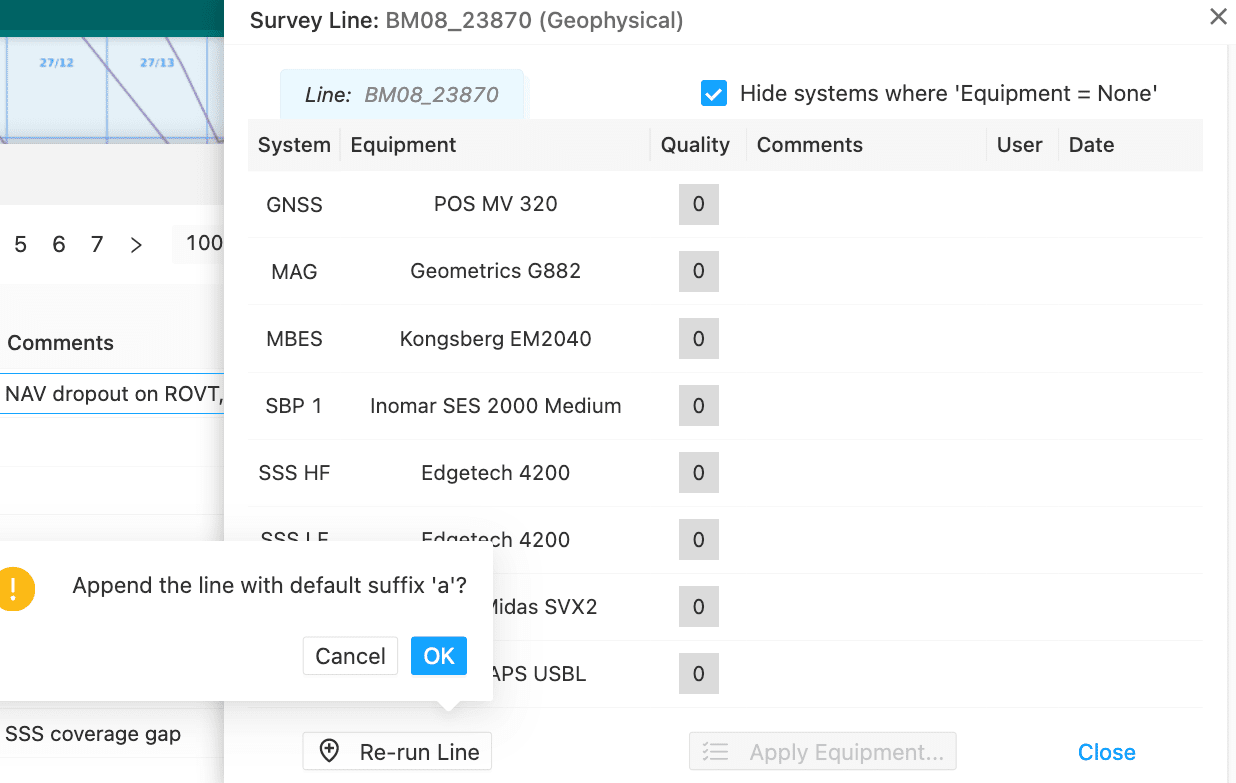 This will create a new record with a new equipment quality tab. This means you can use the radio button to update the quality and date for each run.
 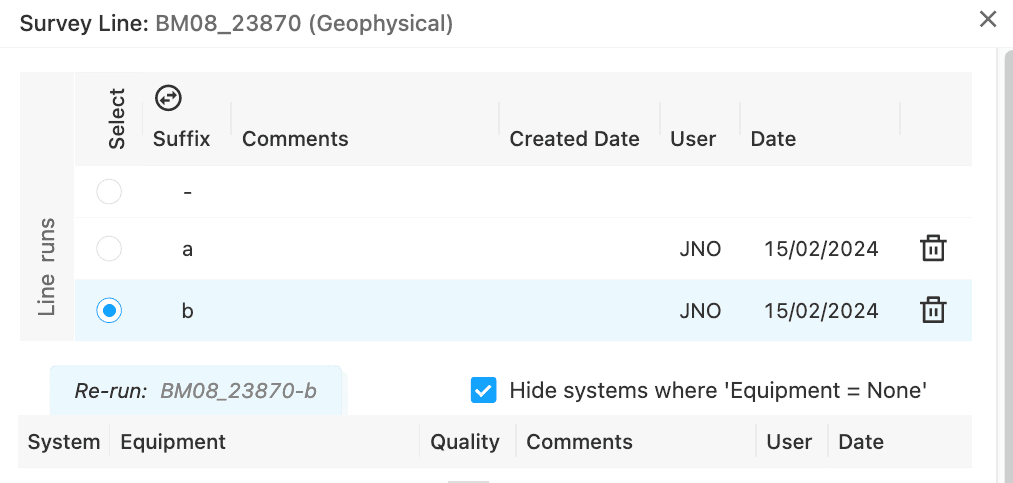 To change the
 Suffix from the default A, B, C... select the button above the Suffix column.
For Infills please agree with the IRIS team and the project manager how to record these. It might be preferable to add Re-run lines in once a week or at the end as a seperate layer.
Save Changes
Once you have completed your data entries, click the Submit button at the foot of the primary form. The data can be subsequently edited and updated in the same manner as described above.
Work Scope - Locations
Each pre-defined location is listed. Associated information shows the location name, type, coordinates and, where applicable, target depth. A bullseye icon allows the user to zoom to the location on the map.
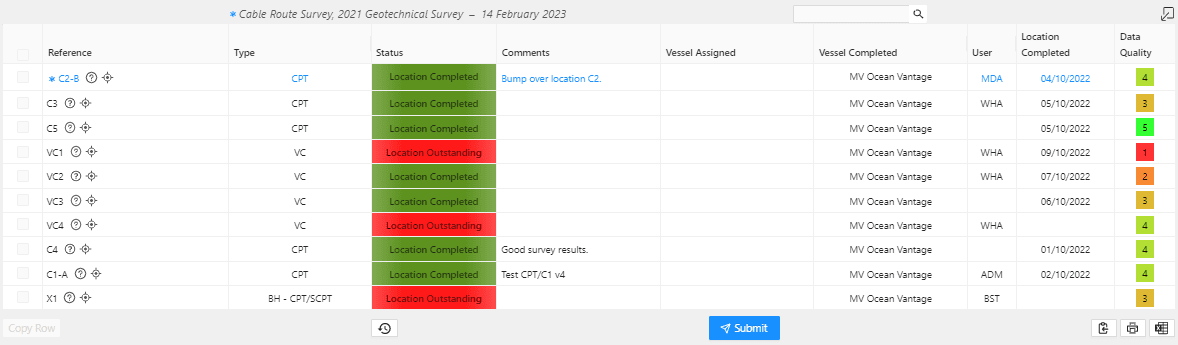
For each location, the OCR should maintain a regular update of the following information:
- Status - Update the
statusof thelocationfrom the options within the drop down list. - Comments - Add appropriate comments with respect to the
locationor the operations associated with it. - Vessel Completed - Add the name of the vessel that completed the
location, from the drop down list options. - Date - Enter the date that the
locationwas first commenced, and then on any subequentstatuschange - Data Quality:
This section allows you to estimate and enter the quality level of the overall performance on the location. To do this, click within the column containing the quality number. This initiates a new pop up form that describes the operational performance on the location.
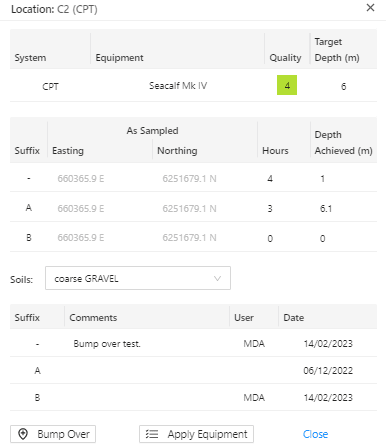
In the first section, enter the equipment type from the drop down list and the assessed data quality for the work completed on the location.
In the second section, enter the as-completed coordinates for the location, the number of hours of work undertaken on this location, and the penetration or depth achieved on the sample or operation. Also please enter your best assessment of soils type for the location.
Where a 'bump over' is required to re-position the location, click the Bump Over button. This creates a replication of some of the data entry fields that should be similarly completed as described above. Each new Bump Over location is suffixed A, B, C etc
Once the Equipment details have been entered for one location, this can be applied to ALL locations by clicking Apply Equipment
Save Changes
Once you have completed your data entries, click the Submit button at the foot of the primary form. The data can be subsequently edited and updated in the same manner as described above.
Work Scope - Zones
Each pre-defined zone is listed. Associated information shows the zone name and type. A bullseye icon allows the users to zoom to the zone on the map.
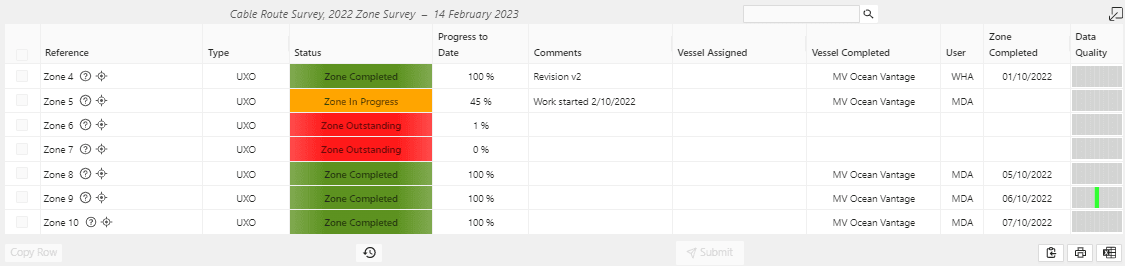
For each zone, the OCR should maintain a regular update of the following information:
- Status - Update the
Statusof thezonefrom the options within the drop down list - Progress - enter the progress to date of Work on the
zone.0% = zone uncommenced, 100% = zone completed - Comments - Add appropriate comments with respect to the
zoneor the survey of it - Vessel Completed - Add the name of the vessel that completed the
zone, from the drop down list options - Date - Update the date each time the
Statuschanges or theProgress %is updated. - Data Quality:
This section allows you to estimate and enter quality levels of the various Equipment and sensors used on the zone. Note this is the same data entry mechanism as described for Work Scope type Lines. In this way issues and trends across multiple zones can be readily identified.
For each System listed, confirm the Equipment type being used, enter the quality of the data (0-5), and add any comments. The User and Date columns are auto populated. Once the Equipment details have been entered for one line, they can be applied to ALL lines by clicking Apply Equipment
Save Changes
Once you have completed your data entries, click the Submit button at the foot of the primary form. The data can be subsequently edited and updated in the same manner as described above
Work Scope - Routes
Each pre-defined route is listed. A route may be associated with a single cable or pipeline or multiple array cables. Select the required route and click the Expand button to load the data entry form.
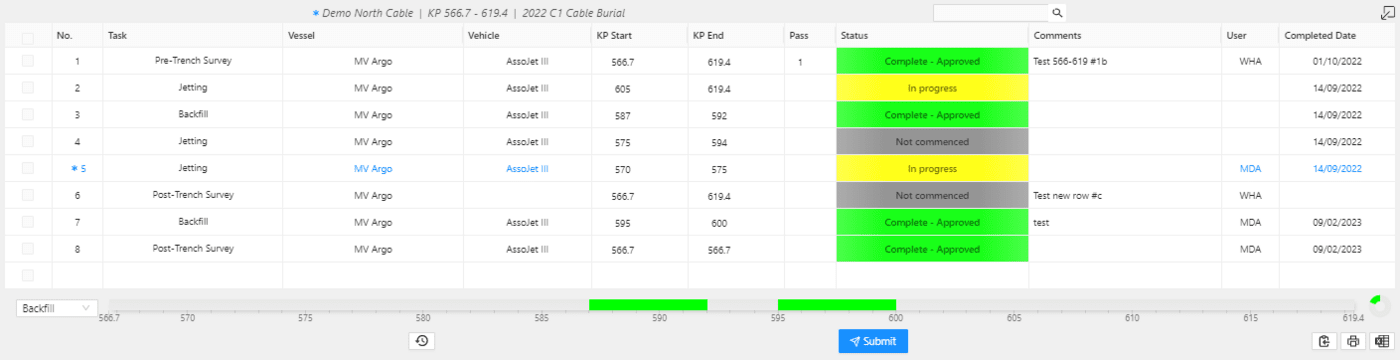
As you will see, Work Scope performance data entry for routes is a little different from the other Work Scope types. Fundamentally it is related to the different Tasks performed on the route within user defined KP ranges.
The Work Scope on each route will typically comprise of a number of Tasks. e.g.
- PLGR
- Pre-lay survey
- Cable lay
- Cable burial
- Cable protection
- As-built survey
For the selected route, the OCR should maintain a regular update of the following information:
- Task - select from the pre-populated list of
Tasks - Vessel - select the vessel that undertook the
Taskfrom within the drop down list - Vehicle - select the vehicle deployed from the vessel that undertook the
Task, e.g. trencher, jetter, ROV,NONE - KP range - enter the applicable KP range that was undertaken
- Pass - enter the
Passnumber, if two or more passes were undertaken. E.g. to get the cable down to depth - Status - update the
Statusof theTaskfrom the options within the drop down list - Comments - Add appropriate comments with respect to the
Task - Date - Update the date each time the
Statuschanges
Please note:
- Existing rows may be edited when there is a change of status
- Do not change the Task on an existing row, add a new row
- A new row should be added when a new KP range is introduced, or a different Vessel or vehicle is introduced to an existing Task/KP Range
- The rows should be entered time sequentially as the Work is done
Progress Display
As a visual check on the data entries, a horizontal bar representing the entire route RPL is shown at the bottom of the form. Select the Task from the drop-down list and the graphic will present the Task Status of each 1m of the entire route.

Save Changes
Once you have completed your data entries, click the Submit button at the foot of the primary form. The data can be subsequently edited and updated in the same manner as described above.
Quality Assurance
The final Data Entry point is `Quality Assurance'. This section covers three areas:
- Incidents - Health and safety incident logging tool.
- Observations - General observations about different aspects of the job by the client representative.
- OCR Report - a portal for entering performance and quality commentary that will form part of the auto-generated OCR Report
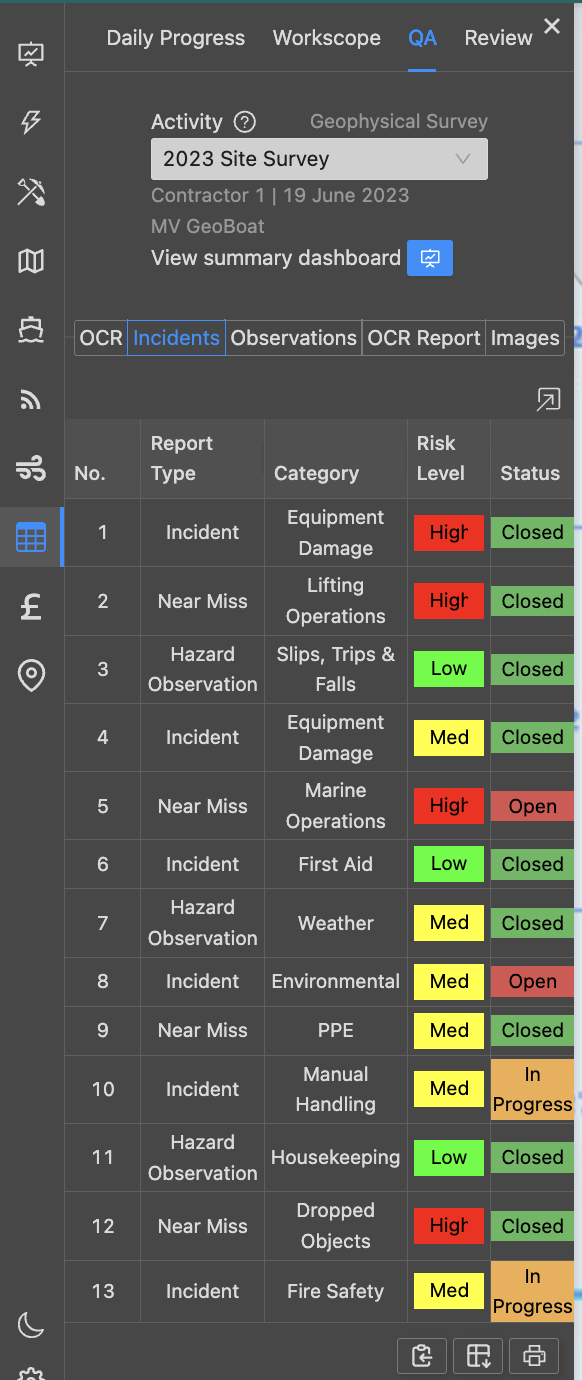
When clicked, and the Activity is selected, the following summary appears.
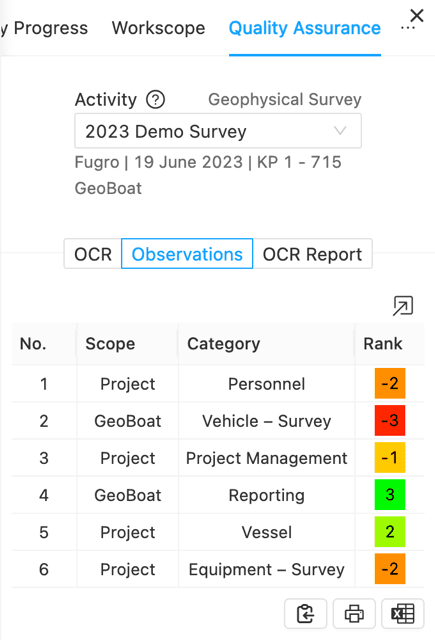
Toggle between Incidents, Observations and OCR Report as required.
Quality Assurance - Incidents
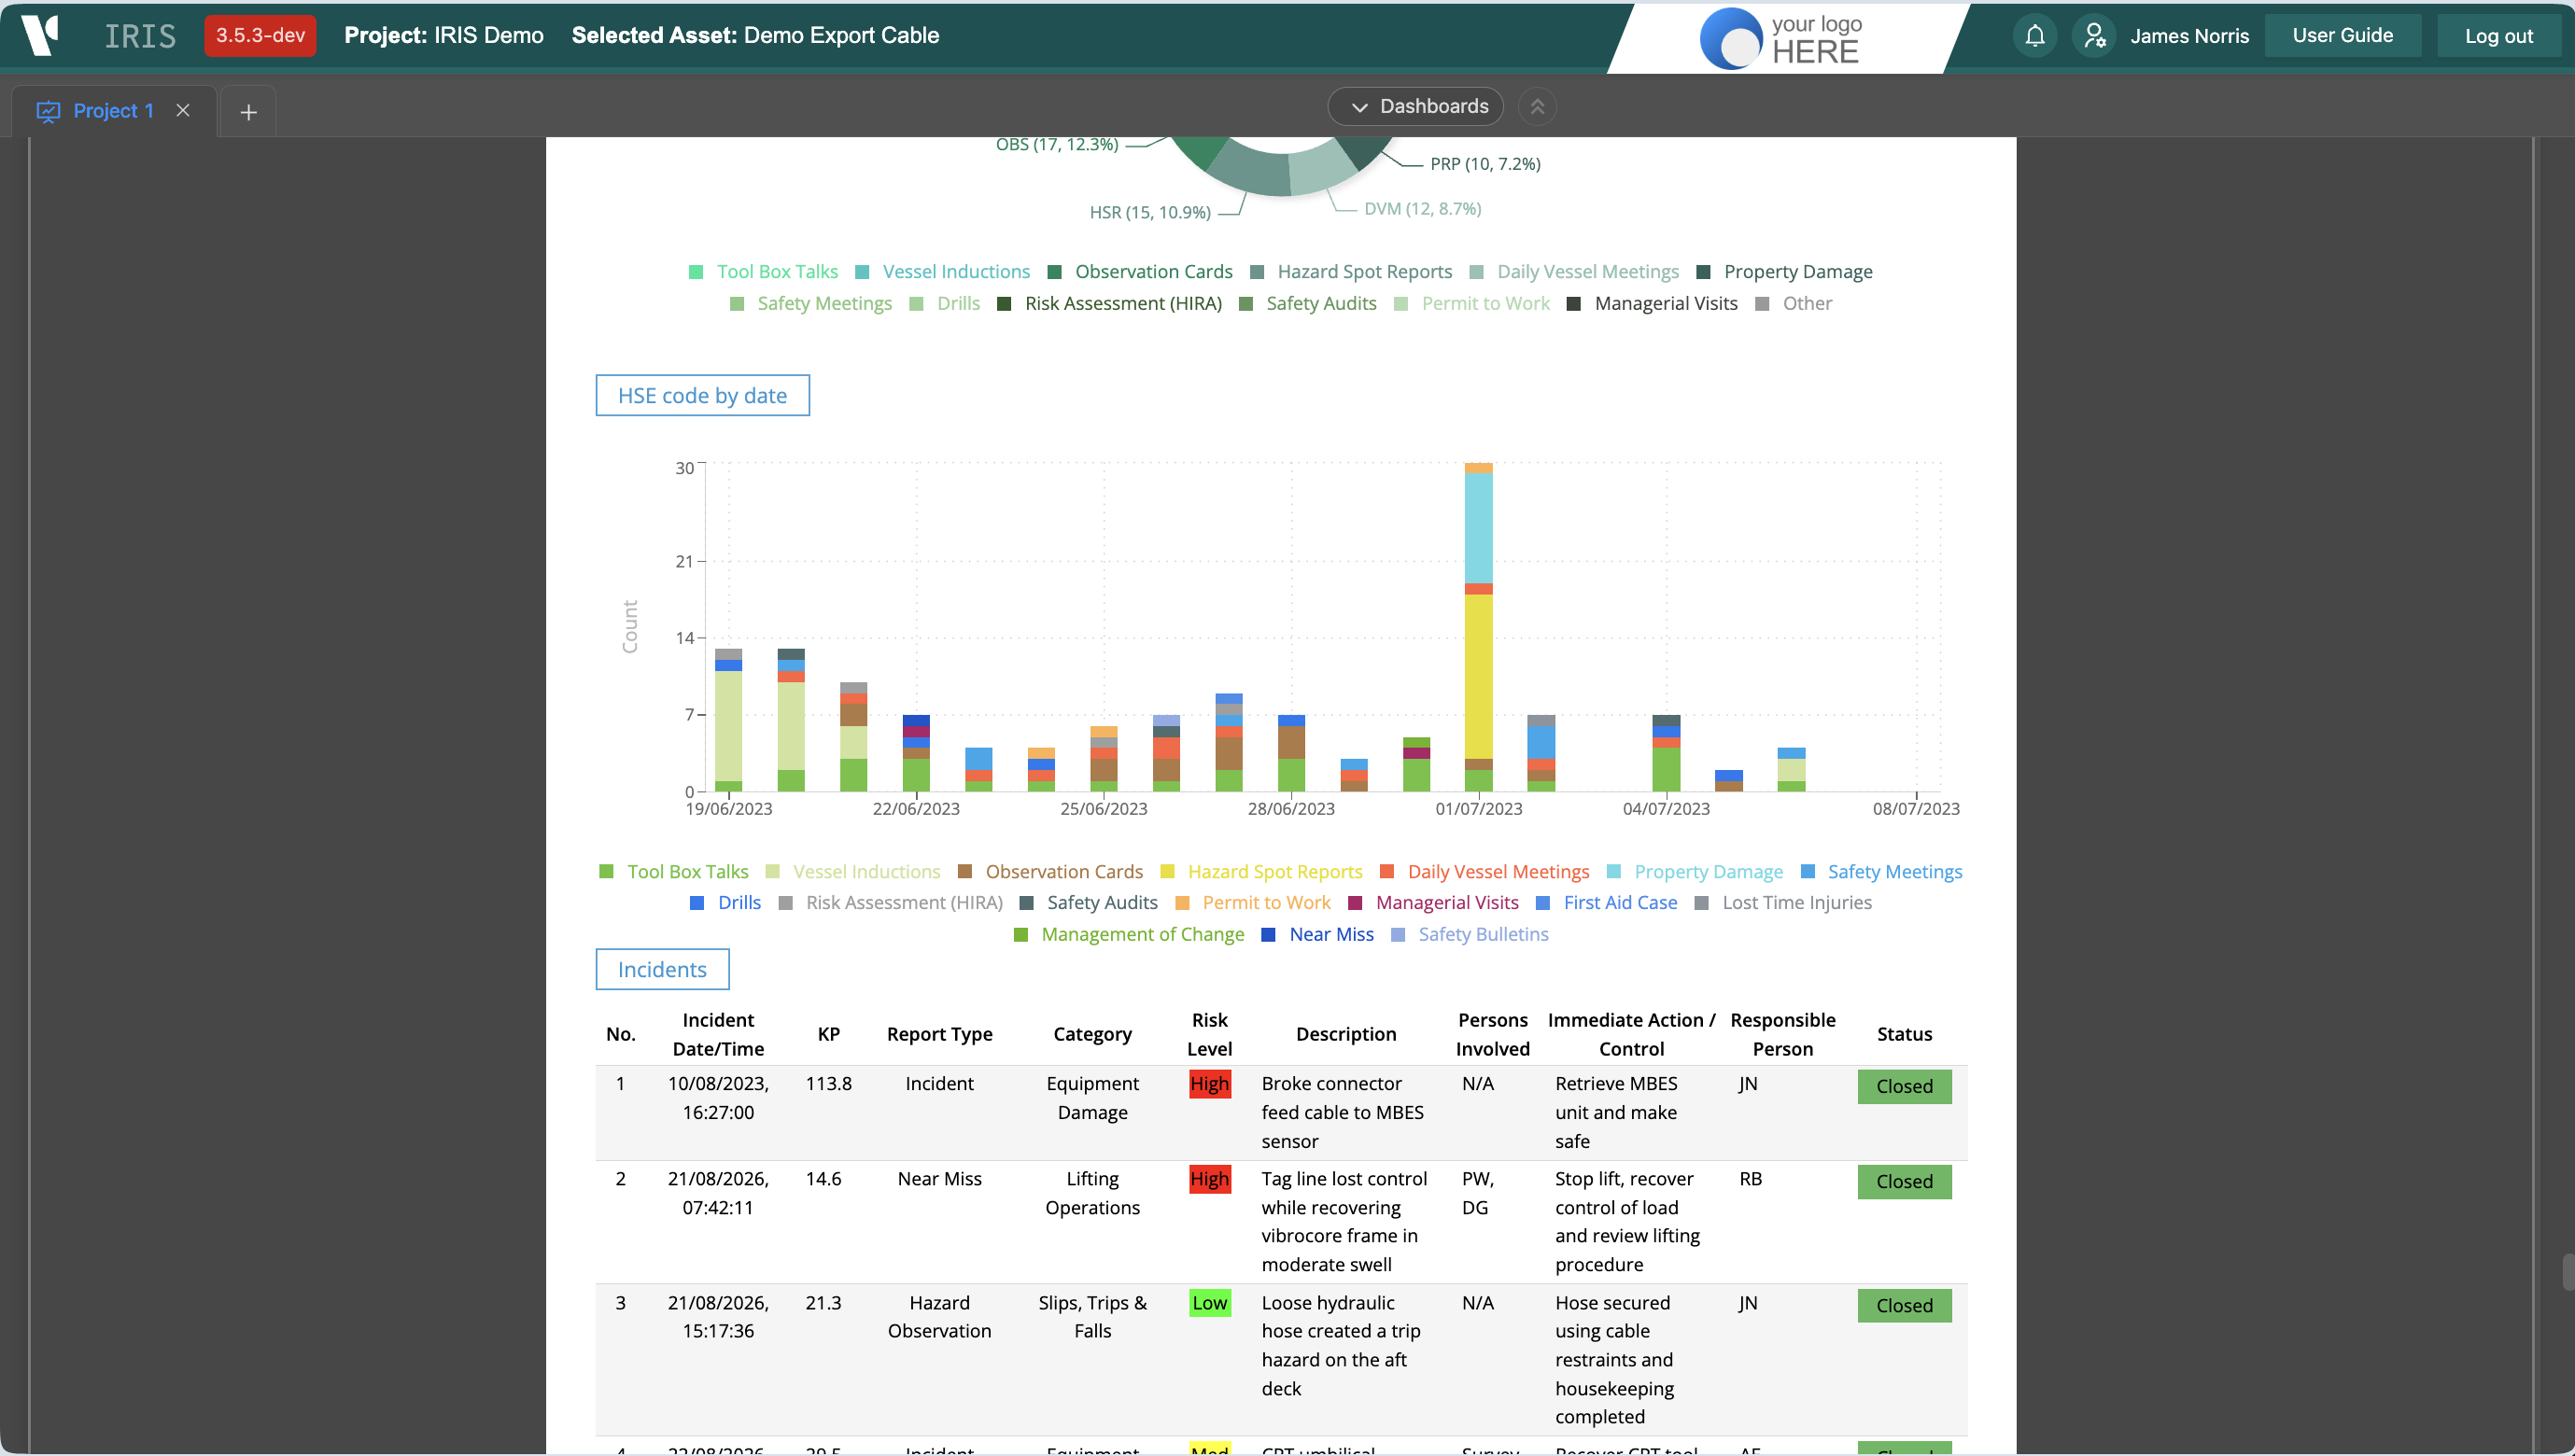
When a health and safety Incident is logged offshore, a record of this can be stored in IRIS.
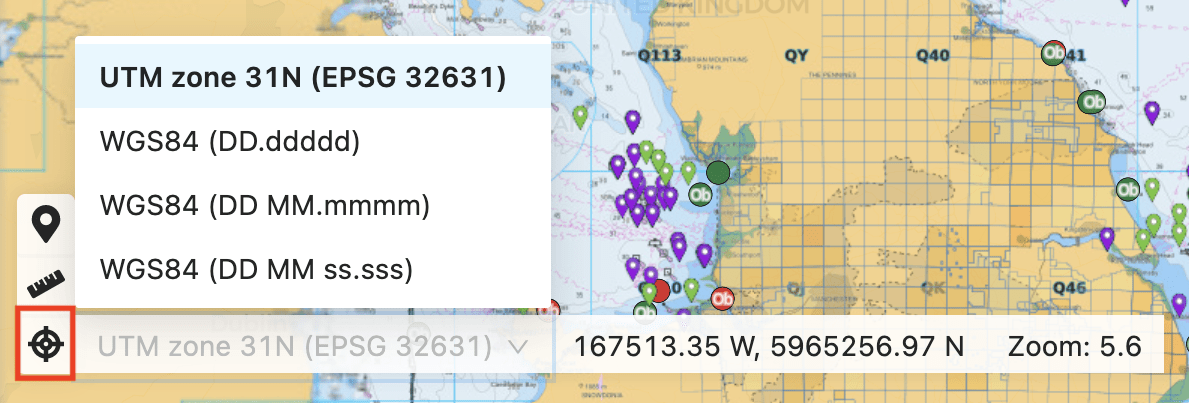
Like other tools the default co-ordinates can be changed from project easting and northing to latitude and longitude by first changing the Co-ordinate system in the bottom left of the map window. When the correct co-ordinates are entered the incident log will appear as triangle locations in a map layer (With a page refresh).
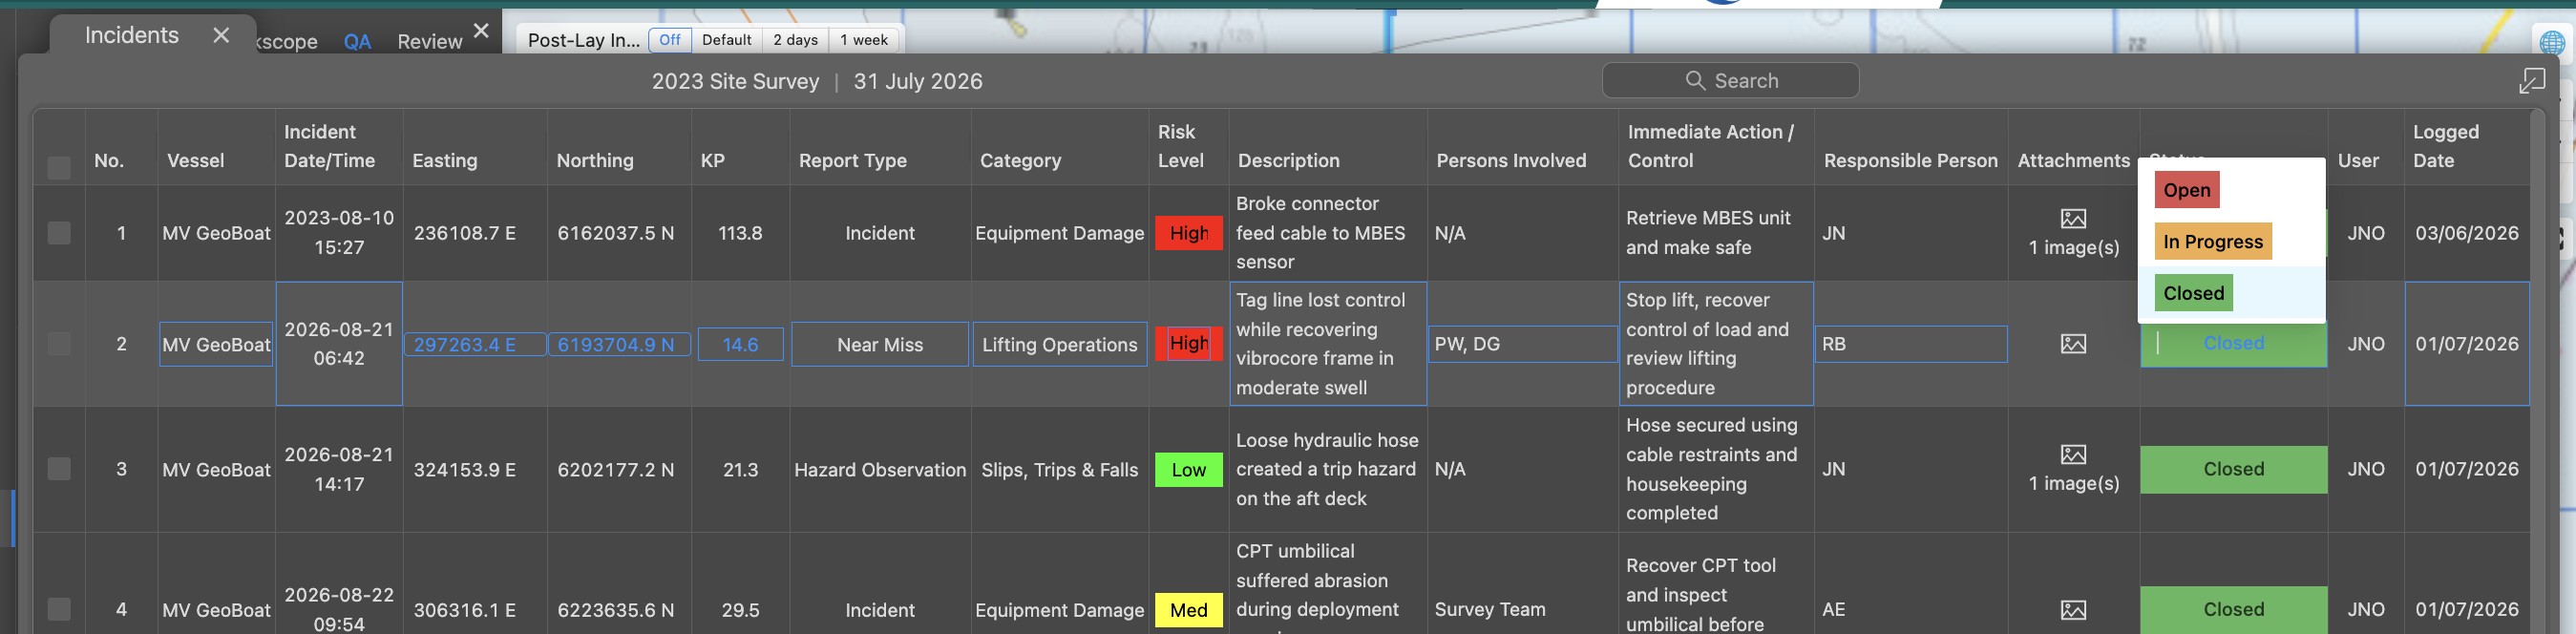
Please fill out all fields but please don't use full names in Person Involved or Responsible Person column. Either refer to initials, positions or teams. Attach relevant images and throughout the job please update the status e.g. Open, In Progress, Closed
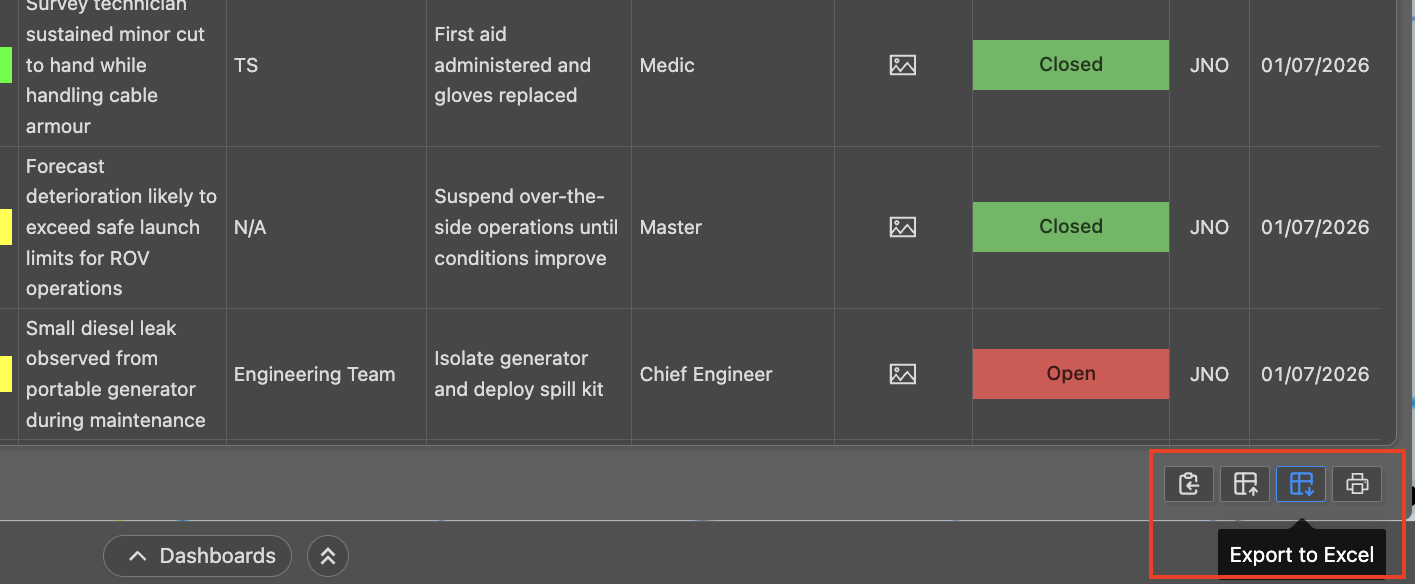
Like other inputs you can import most of the data via excel. Please first use the Export to Excel button (bottom right) to get the right format out, then use that format to fill out the spreadsheet and paste in cleanly using the Import from CSV button (bottom right). Images will need to be attached manually.
This table will automatically show in the client rep end of job OCR Report and be available in the Project Management Dashboard.
Quality Assurance - Observations
Observations are entered for an Activity and may be associated with any assigned vessel to that Activity, or where applicable more widely, at the project level. The following graphic shows an example of a Observations form.
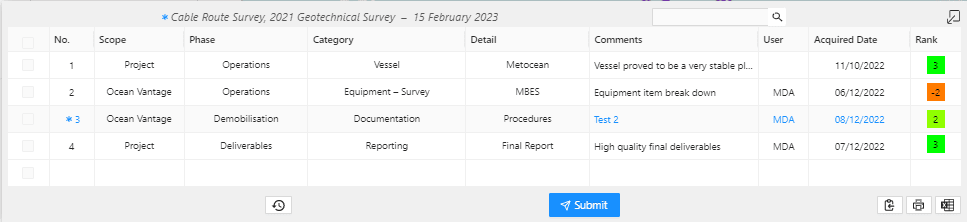
Observations are both positive and negative and OCR's are encouraged to capture a number of Observations on each Activity covering all aspects. The process incorporates a high degree of classification and categorisation which will help us more easily analyse lessons learnt on single and multiple projects undertaken by the same Contractor, vessel, equipment etc. We typically classify a -3 rank as a Lesson Learnt whilst every other rank is subjective to each representative.
To add a new Observations, select a new row and make selections and enter data as follows:
- Scope - does this observation apply to one of the vessels on the
Activityor to the project in general ? Select accordingly. - Phase - select the applicable
Activityphase that the observation is relevant to - Category - further select from a pre-populated list of categories
- Detail - further granularity based upon the category selected
- Comments - add your comments describing the observation
- Rank - assess the importance of the observation within a range of
-3 (lesson learnt)to+3 (very positive).
Note that all Observations can be sorted by clicking in the appropriate column headers. The table can be exported to printer, Excel or the clipboard. Note also that the Observations table will become incorporated within the auto-generated OCR report.
Save Changes
Once you have completed your data entries, click the Submit button at the foot of the form. The data can be subsequently edited and updated in the same manner as described above
Quality Assurance - OCR Report
The OCR report section allows for a report to be built by pulling data from the Activity and Work Scope data and supplementing this with additional text and comments relating to various aspects of the operation. We encourage you to fill this out throughout the activity to reduce time at the end of the job creating the final report. Edits can be made to sections already submitted at a later date.
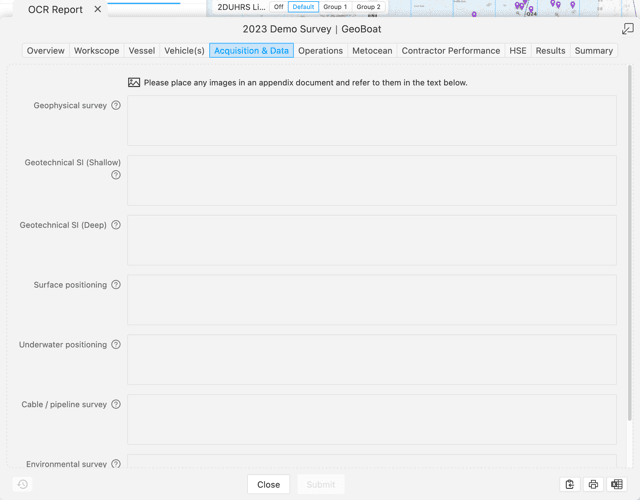
The OCR Report contains multiple tabs or sub-sections, breaking down the information that can be included. These tabs are:
- Overview - overview of the project and associated activities, company documentation and briefings
- Work Scope - summary and description of work scope and completeness
- Vessels - details of vessel, performance notes and suitability
- Vehicle(S) - Details of vehicles, performance notes and suitability
- Acquisition & Data - details of current surveys including: Geophysical, Geotechnical SI (Shallow/deep), Surface positioning, Underwater positioning, Cable/pipeline and Environmental survey.
- Operations - details of mobilisation, operations, fishing liaison, port calls, permits, field reports and demobilisation
- Metocean - descriptions of the conditions experienced such as weather forecasts
- Contractor performance - information surrounding the teams, support and documentation of contractors
- HSE - details of HSE methods put in place as well as documentation of incidents/events and marine mammal assessments
- Results - summary of the preliminary result, lab testing and final report recommendations
- Summary - record of any finding or recommendations regarding the performance of the contractor, the Company and any final conclusions
Not all section within the OCR Report have to be completed if they are irrelevant or unavailable but it is advised to put an N/A in each of those boxes to show it hasn't been missed. Those that are left empty will show up in the report but these can be removed during submission of the final report.
When entering text into the space provided, they will continue to expand with no limits in word count, however formatting may be lost if copy text from an different software (e.g. Microsoft Word) so be aware when using bullet points, subtitles or formatted text (Bold, Italics or Underlined).
Images
Images can be included within the OCR Report under the Images tab. 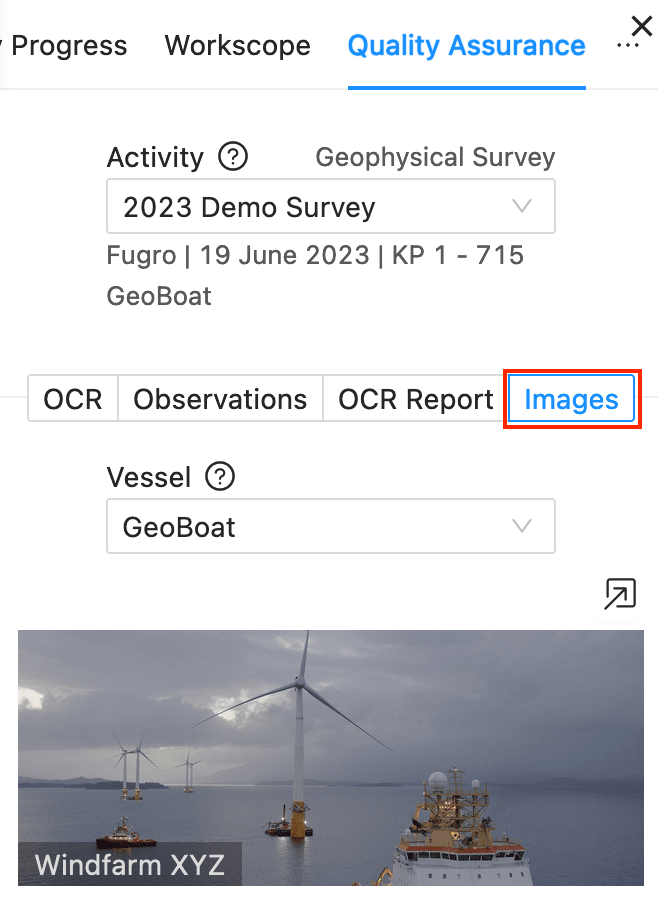
Within this tab a .png or .jpeg image files can be selected or imported on with File Name, Title and Description text boxes that can be filled out. 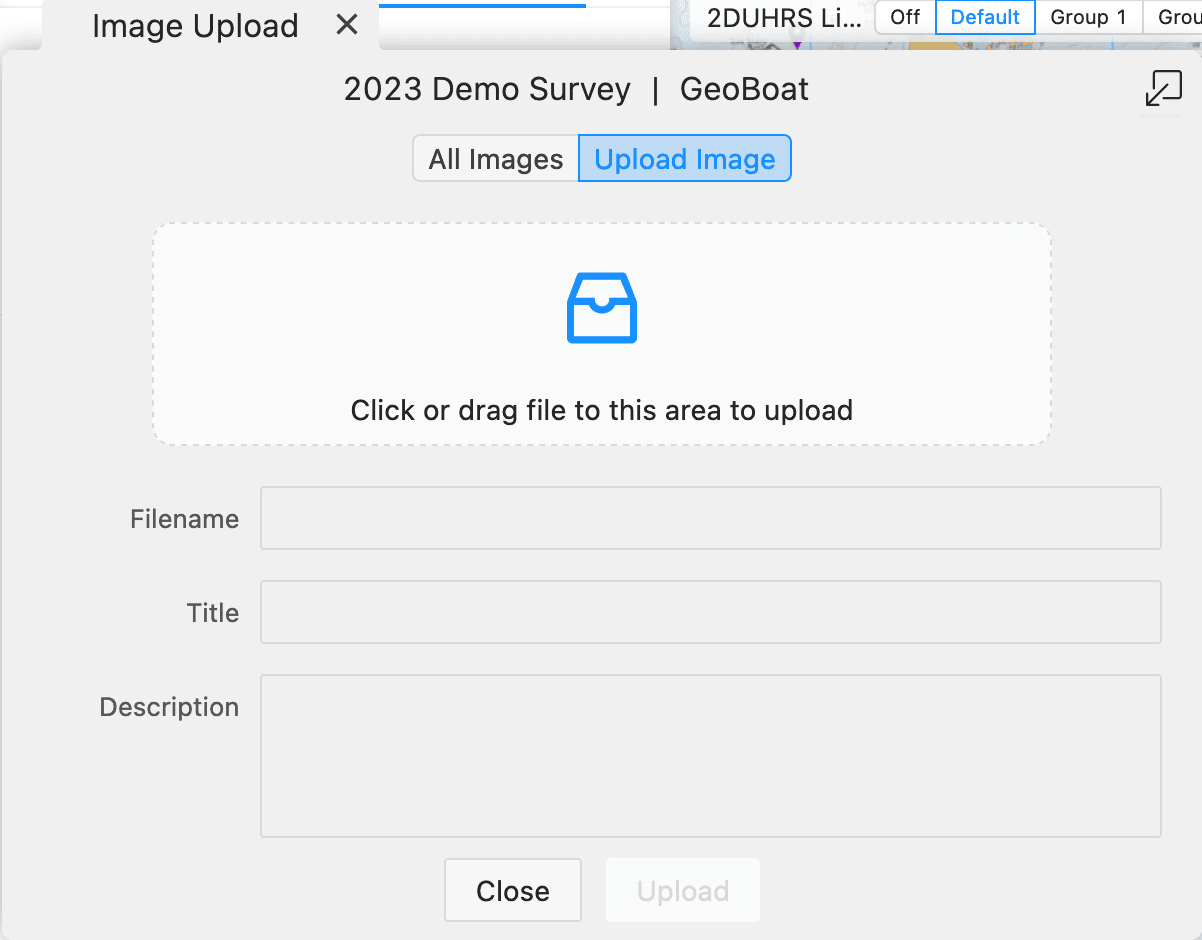
Once the initial image is added to the Images tab, these can be linked to the relevant section within the OCR Report tab. Beside each text box within the form there is a small photo icon which allows a photo to be selected. This will then will be referenced within the selected text box.
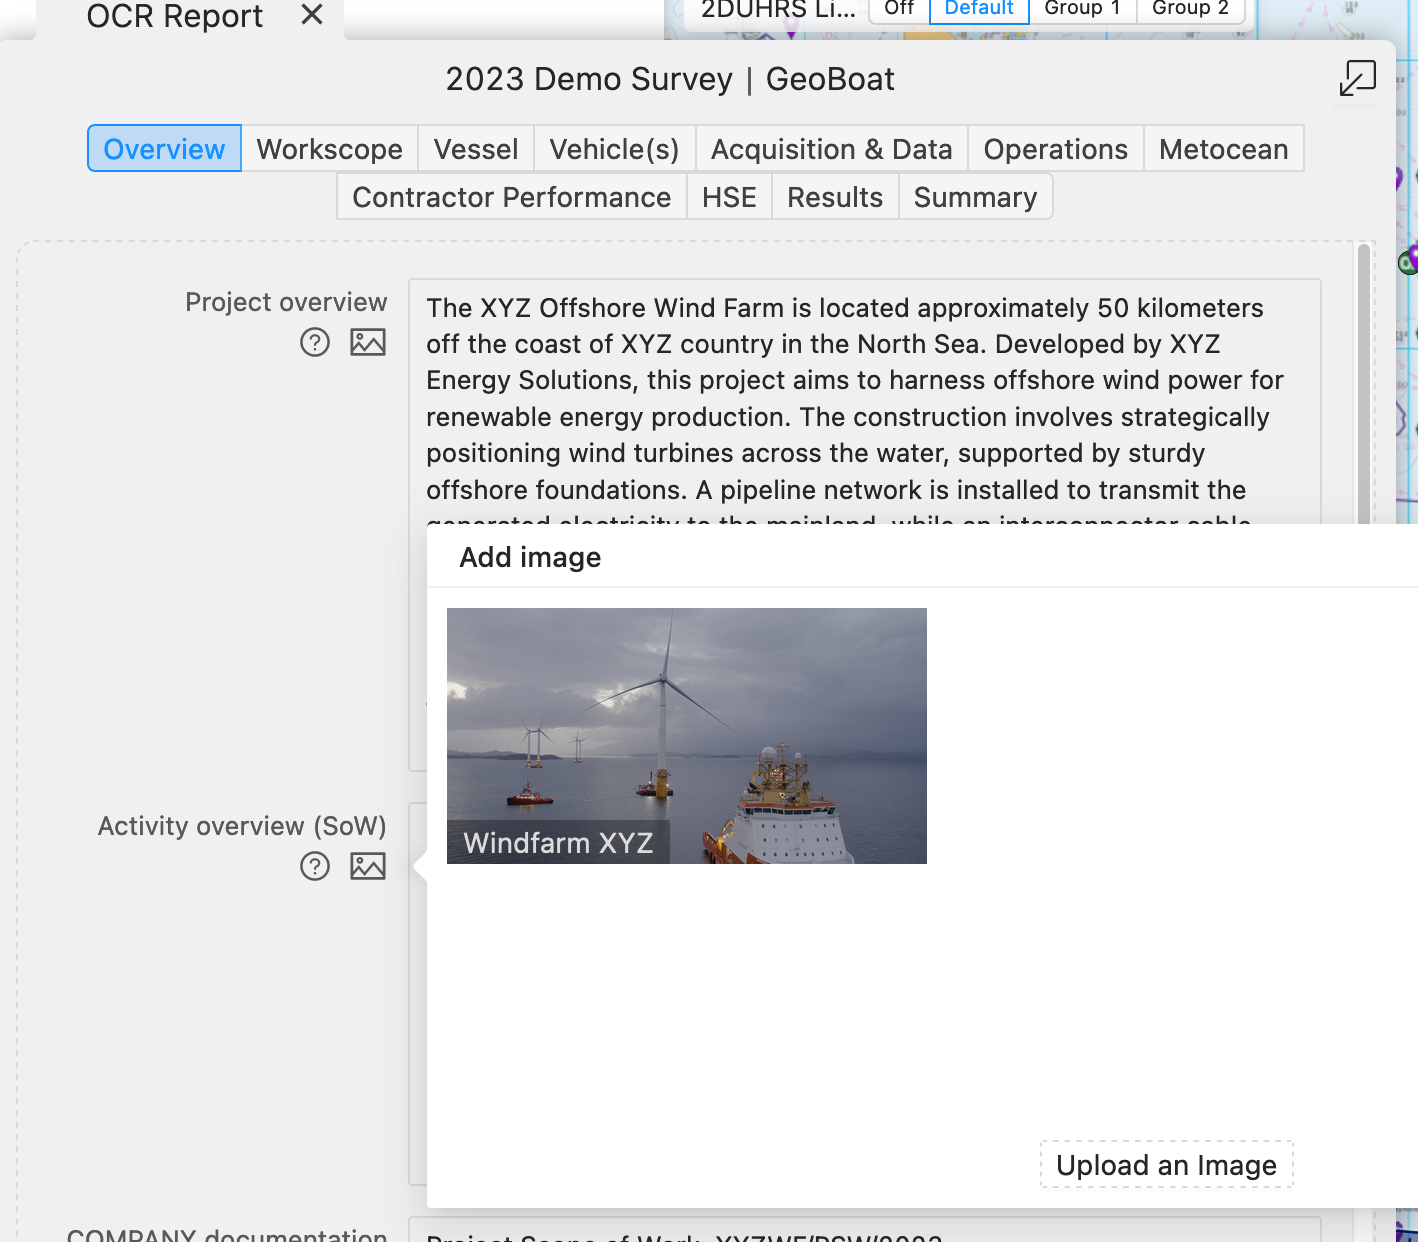
The image will then be added at the end of each sub-sections (described above) of the OCR Report. Each image will only appear automatically within the report ONCE, priorities by the order of sub-sections. This means that if an image us referenced in multiple sections of the OCR Report form it will only appear in the first sections. If additional images are needed they can be added manually when editing the final report within the Reports section in the Quality Assurance tab within the Project Management Dashboard.
Save changes
To save the changes you have made, click Submit button at the foot of the form. The text will then be formatted and combined with project data to produce a OCR Report that can be viewed under reports in the Quality Assurance tab within the Project Management Dashboard and exported as a PDF.
Review
This section provides visual feedback that allows a user or project manager to check Data Entry input to ensure everything is up to date and no parts are missing.
Simply select Activity and Vessel from the available drop downs to see status and info for each Data Entry section. Under each heading there will be a few checks which show a cross, question mark or tick based on predetermined validation rules along with a ? hover which provides more detail.
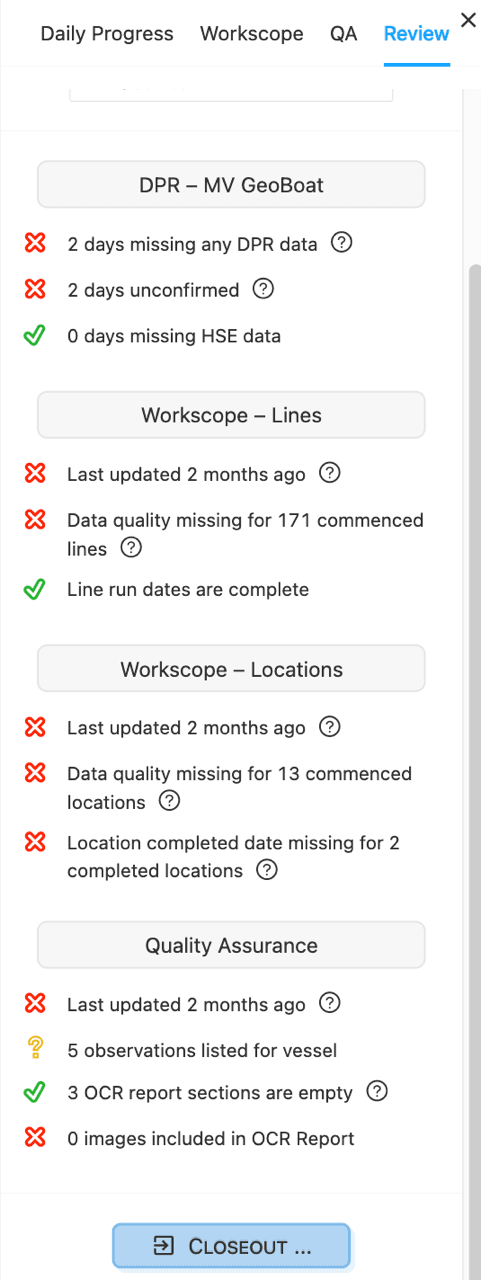
Typically this will include checks like:
- Is there any missing DPR information?
- When was something last updated?
- How many sections have been filled out?
This should aid and remind users of the various elements to update within the Data Entry module. Project Managers will have the ability to close out the activity from this page which will disable Data Entry for that activity and apply an end date.